Unlike the many cooks whose love affair with food was sparked by assisting their grandmother in the kitchen, Molly Watson’s culinary passion grew beside her grandmother at the table. Watson, a Minneapolis native, remembers meals at French restaurants and observing her grandmother effortlessly host dinner parties in their Northern Minnesota cabin. Her affinity for food was bolstered by a childhood spent foraging for mushrooms and blueberries. Though at first she pursued academia, earning a Ph.D. in Modern European History at Stanford University, eventually her passion won out and she embarked on a food writing career. Now a San Franciscan, Watson has become an expert in locally sourced food and recently penned her first cookbook, Greens + Grains: Recipes for Deliciously Healthful Meals.
Why do greens and grains make for a good pairing?
There are so many different kinds of greens, and there are so many different kinds of grains, and the combinations are sort of endless. You can make meals out of these two things that feel satisfying, even if you’re not used to eating so much of a plant-based diet.
Kale is the green on everyone’s radar. Can you shed a little light on the different varieties?
The great news there is there are different varieties of kale, but they are not all that different. You can almost always use any kind of kale you feel like or whatever kind you have on hand. Like most people, I have a fondness for the Tuscan kale with the flatter, darker leaves. It’s slightly less bitter than the traditionally curly kale that you see, but it also has a fibrous texture. When cooking kale, the difference is negligent in most recipes. If there’s only one kind at the market, then that’s just fine.
OK, so what’s a good runner-up to kale?
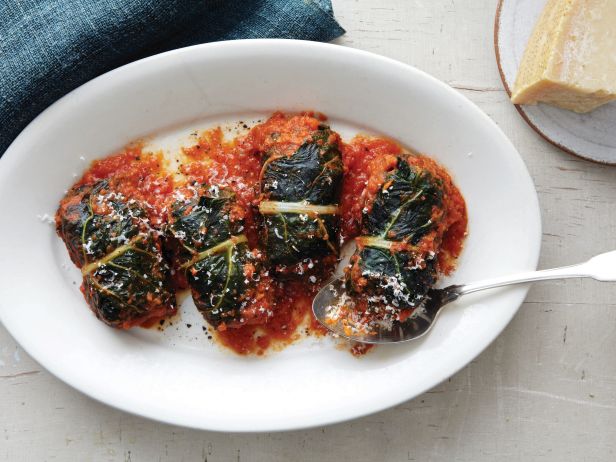
I really like chard. It does have an earthy edge that some people are not as thrilled with. You just have to treat it right. I have a recipe, Swiss Chard Little Doves, where I stuff it with a grain mixture and braise it with tomato sauce; it’s just fabulous. The other thing I’m going to throw out there is that I’m thrilled with all the greens that come with other vegetables — the ones you might get because you bought something else — like beet greens or turnip greens. I’m a really big fan of those, because I take a frugal pleasure in using them. Kohlrabi greens are also totally edible and delicious. Mustard greens too deserve a shout-out. They are pretty widely available, and they just have an amazing flavor.
How do you convince salad eaters that they should become acquainted with cooking their greens?
My mother-in-law was over and I was making a dish for her, braised kale. She had mentioned she didn’t particularly like kale beforehand. So I blanched the kale first, because that takes out some of the bitterness. Then I chopped it and braised it in tomato and she loved it. She was sitting there and eating this giant portion of it. She said, “Oh, I thought when you boiled kale, doesn’t it take out the vitamins?” “Well, it takes out some,” I said, “but if you enjoy eating it, isn’t it better than not eating it at all?” Greens and whole grains are so good for you that however you go about eating them is just fine, even if you cook the life out of them. They have some vitamins and fiber left. They are one of things that are so good for you, you can cook them however you want and feel pretty virtuous about it.
Greens run the flavor spectrum. How can greens change a dish?
If you like a peppery, spicier kick, then arugula or mustard greens will give you that. In the onigiri recipe I cook down the mustard greens until they are almost dry. Then I mix them in with the rice bowl and you end up with this intense, nutty flavor from the greens. If the greens aren’t the central ingredient in the dish, they aren’t going to overpower most other flavors. I loved doing the soups so much for that reason. The greens absorb all the flavors in this wonderful way.
What is your top tip on cooking with grains?
When you want to cook whole grains, the key is it takes a little bit of planning. One great thing is most grains, once cooked, freeze really nicely. If I’m cooking up barley or rye berries, I’ll usually cook more than I need. Then I’ll freeze the extra so I can put them into a pot of soup or defrost and toss into a salad. That would be my tip: Cook a lot of them and freeze the extra.
Swiss Chard Little Doves with Tomato Sauce
Serves 4 to 6
Tender but flavorful Swiss chard leaves wrap up a savory filling of whole grains and chopped chard stems before being baked in a simple tomato sauce in this modern take on golubtsy (“little doves”), or stuffed cabbage. I like to buy extra chard to guarantee plenty of leaves large enough and intact enough to make single bundles out of them, but feel free to cobble two leaves together for some of the packets. Red chard or rainbow chard also work nicely in this recipe; since everything is cooked in a tomato sauce, the slight “bleeding” from the red stalks will be well hidden.
1/2 cup pearled barley
1/2 cup quinoa
One 28-oz can whole peeled tomatoes, drained
2 roasted red bell peppers, peeled
4 tablespoons butter
1/2 teaspoon fine sea salt, plus 1 tbsp
1/2 teaspoon red chile flakes (optional)
1 yellow onion
12 large Swiss chard leaves
1/4 cup chopped toasted walnuts
1 tablespoon extra-virgin olive oil
1/2 teaspoon freshly ground pepper
Bring a large pot of water to a boil.
Rinse the barley and quinoa and drain. Put the barley and quinoa in a large bowl and cover with cool water.
Whirl the tomatoes and roasted red peppers in a blender or food processor until smooth. In a wide saute pan over medium-high heat, combine the pureed tomato mixture, butter, 1/2 teaspoon salt, and chile flakes (if using). Cut the stem end off the onion and trim the root end, leaving the core at the root to hold the onion together. Cut the onion in half through the root end, peel the halves, and add them to the tomato mixture.
Bring the tomato mixture just to a boil, stirring in the butter as it melts, then lower the heat to maintain a gentle simmer. Cook, undisturbed, until the butter separates out from the tomatoes and floats on the top, about 30 minutes. Adjust the seasoning.
While the sauce simmers, rinse the chard leaves and cut out the stems. Finely chop the stems and put them in a large bowl.
Add the 1 tablespoon salt to the now-boiling water. Blanch the chard leaves by dipping them into the boiling water until they wilt, about 30 seconds. Drain the leaves and rinse them thoroughly with cold water to cool them quickly (this will also set the green color). Gently squeeze as much water out of them as you can, open them up again, and set aside.
Drain the barley and quinoa and add to the chard stems along with the walnuts. Drizzle with the olive oil and sprinkle in the black pepper. Toss to combine.
Working with one leaf at a time, lay it on a work surface, put 3 or 4 tablespoons of the filling at one end of the leaf, bring the shorter end of the leaf up and over the filling, fold in the sides to encase the filling, and then roll it up to the longer end so the filling is completely encased and the whole thing makes a plump rectangular bundle. Or place the filling in the center of a leaf and simply fold all the sides over the filling and tuck in any corners that stick out. The chard leaves are flexible, so you, too, have some flexibility when shaping them. Both the barley and the quinoa will expand as they cook, so no matter which method you use, be sure to wrap the leaves loosely around the filling. Repeat with the remaining chard leaves and filling. You should have about twelve stuffed chard leaves.
Remove the onion halves from the tomato sauce when it’s done simmering. Stir in 1 cup water and bring the sauce back to a simmer. Set the filled chard leaves directly in the tomato sauce in the pan in a single layer — the sauce will come about one-third to one-half of the way up their sides. Cover and simmer until the barley and quinoa are tender, about 40 minutes. Check on the pan after about 20 minutes and then every 5 minutes or so. If the tomato sauce starts to stick to the bottom of the pan, add 1 tablespoon water along the edges of the pan and adjust the heat to keep a steady and gentle simmer going until 40 minutes have passed and the filling is cooked through and tender.
Serve the stuffed chard leaves hot with a bit of extra sauce under, over, or alongside them, as you like. These keep nicely, covered and chilled, for up to 2 days. Reheat gently, covered and over low heat, on the stove, or cover with foil and reheat in a 350 degress F oven.
Kiri Tannenbaum is a graduate of Le Cordon Bleu Paris and holds an M.A. in food studies from New York University where she is currently an adjunct professor. When her schedule allows, she leads culinary walking tours in New York City and is currently at work on her first book.