
The squat is the most useful movement in fitness. It builds leg strength, hip mobility, core stability, and the raw physical competence to sit down and stand back up without thinking about it — which is the single best predictor of independent living as people age.
It’s also the most commonly done wrong movement in fitness. Not because squatting is complicated. Because the cues most people learned are wrong, oversimplified, or both. “Knees shouldn’t pass your toes.” “Go parallel.” “Keep your back flat.” Some of those are half-right, some are outdated, and the rest depend on your body and the specific squat you’re doing.
This guide covers how to squat properly — bodyweight, goblet, and the basics of barbell — and then the four mistakes that actually cause most squat-related aches and injuries, with a specific fix for each.
The central principle
A good squat tracks your natural hip, knee, and ankle structure. There is no single “correct” squat — there is the squat your body can do well today, and the one you’re working toward over time. The cues below help you find the right version for your body.
How to squat (bodyweight baseline)
Before adding weight, your bodyweight squat needs to look clean. Most form problems that show up with weight are the same problems that were already there without weight, just amplified. Fix the pattern first. Then load it.
Setup
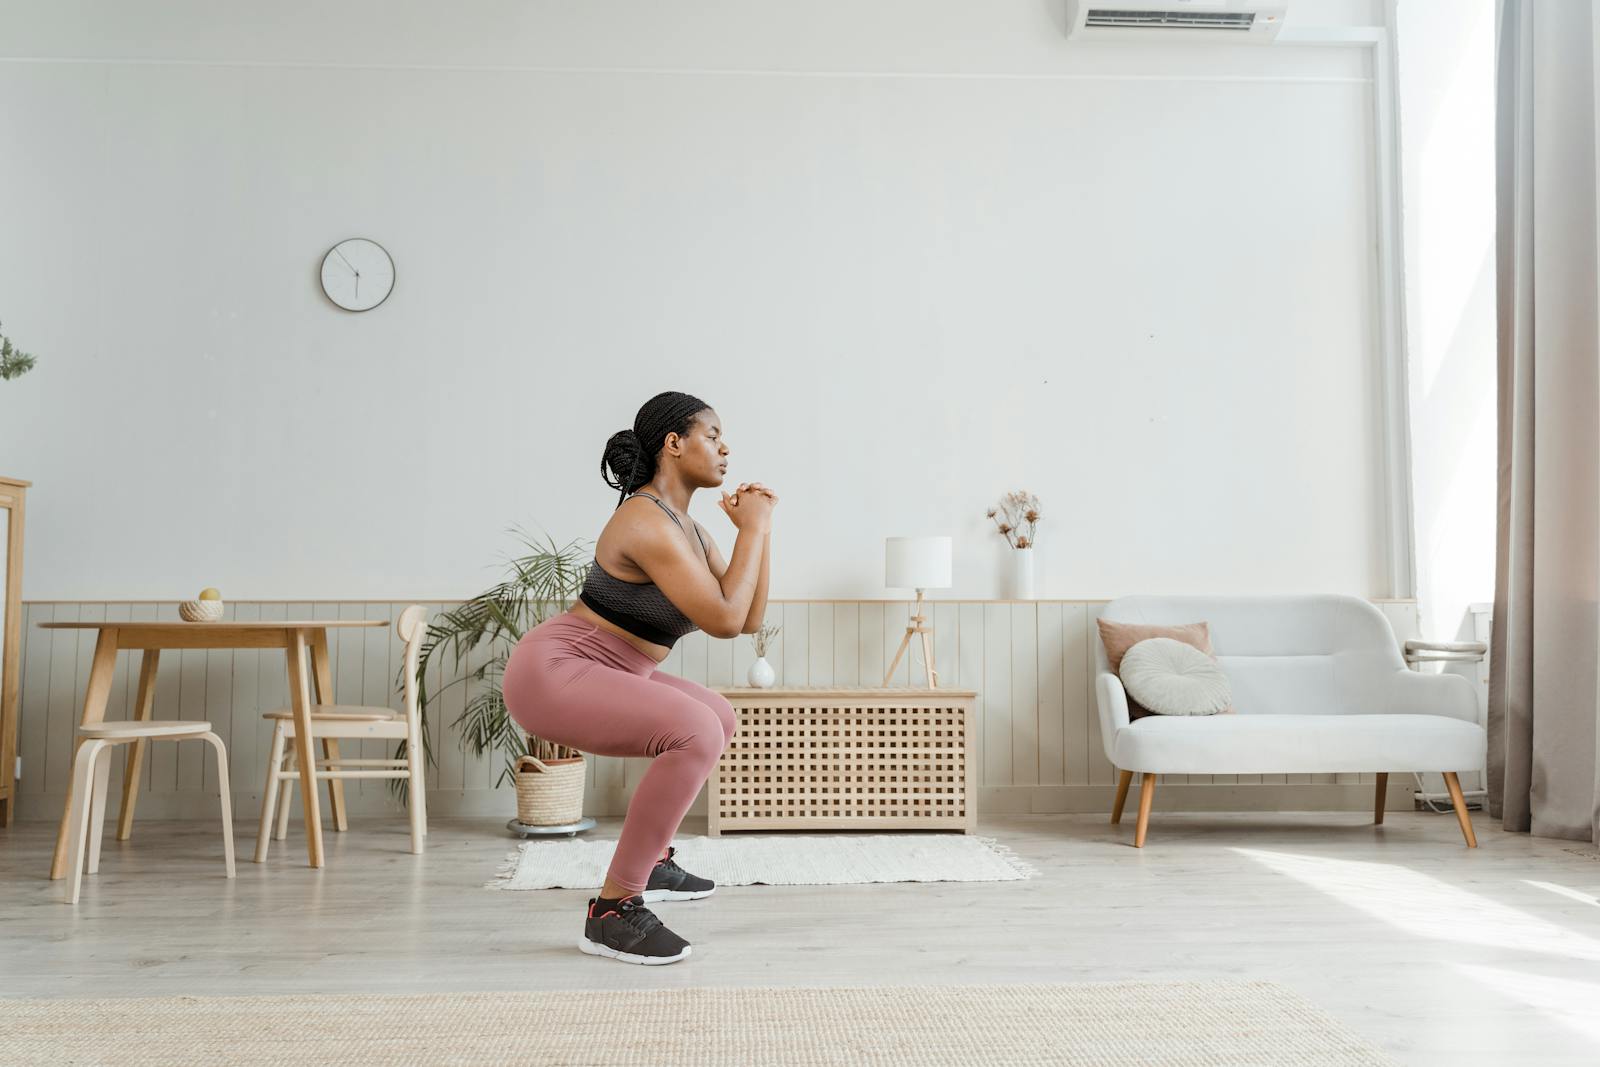
- Stand with your feet roughly shoulder-width apart — the same width as your natural walking stance.
- Point your toes slightly out. For most people that’s 10–20 degrees. Some people need more; if forcing your feet straight causes knee discomfort, your hip anatomy wants more toe-out.
- Weight should be centered over the middle of your foot, not on your heels and not on your toes.
- Stand tall. Chest up. Ribs stacked over pelvis (not flared up or tucked down).
The descent
- Break at both the hips and knees at the same time — do not sit back first or squat straight down first. Hips and knees bend together.
- Let your knees track forward over your toes. They should travel in the same direction your toes are pointing — not inward, not outward.
- Keep your chest up. Imagine a flashlight strapped to your sternum pointing forward, not at the floor.
- Go as deep as you can while keeping your heels flat and your chest up. For most people that’s hip crease at or below knee crease. If your heels lift or your lower back rounds (the “butt wink”), you’ve reached your current mobility limit — that’s your depth for today.
The ascent
- Drive up by pressing through the middle of your foot — the entire foot, not just the heels.
- Keep your chest up as you stand. Chest should lead the way, not trail.
- Squeeze your glutes at the top. Don’t hyper-extend your lower back.
Breathing
Inhale at the top, hold the breath lightly as you descend, exhale through pursed lips on the way up. This is called “bracing” — the held breath creates internal pressure that stabilizes your spine. You’ll feel the difference immediately. It is the single most-skipped fundamental in squatting, and also one of the most protective for your lower back.
The goblet squat (your first loaded squat)


Before you touch a barbell, learn the goblet squat. Hold a single dumbbell or kettlebell vertically against your chest with both hands cupping the top end (or sides of a dumbbell’s bell). Squat.
The goblet squat is the best teaching tool in strength training for four reasons:
- The front-loaded weight naturally pulls you into an upright torso position — good posture is enforced by physics, not by a cue you have to remember.
- The range of motion is deeper than most people achieve in bodyweight squats. The weight acts as a counterbalance.
- Elbows inside knees at the bottom makes form feedback obvious — if your knees cave in, your elbows hit them.
- Load is limited to what you can hold in your hands, which rules out ego-loading that compromises form.
Work up to 3 sets of 10 reps with a 35–50 lb dumbbell (for average-sized adults) before moving to barbell squats. Most people never need to.
Barbell squat basics
Full barbell coaching requires a qualified coach who can watch you lift in person. If you’re taking the barbell step, get at least one session with someone certified — the internet is not a substitute for eyes on your lift. That said, a quick overview:
- Low-bar (barbell on top of the rear delts, more hip dominant) favors taller lifters with shorter torsos and more lower-back/glute/hamstring bias.
- High-bar (barbell on the upper traps, more upright torso) favors shorter lifters and focuses more on the quads.
- Most beginners start with high-bar because the upright torso is easier to maintain and less technically demanding.
- Use safety pins set just below your lowest expected depth. Train near, not under, your capacity.
- Film every heavy set from a 3/4 angle. Self-coaching from video catches most form issues before they become injuries.
The 4 most common squat mistakes

These are not “bad” in a moral sense — they’re patterns that show up under fatigue, poor mobility, or a mistaken cue. Each has a specific fix. If any of these apply to you, work on that fix before adding load.
Mistake 1: Knees caving inward (valgus collapse)
What it looks like: as you squat down or drive back up, your knees travel toward each other instead of tracking over your toes.
Why it happens: weak glutes (particularly the gluteus medius), poor hip external rotation, or too much load for your current strength.
Fix: Loop a resistance band above your knees. The band pulls your knees inward, so you have to actively press outward to resist it — which hard-wires the correct pattern. Do 3 sets of 10 band-resisted squats before your main working sets for 2 weeks. Also add direct glute work (lateral band walks, clamshells, single-leg glute bridges) 2× per week.
Mistake 2: Heels lifting off the floor
What it looks like: as you reach the bottom of the squat, your heels come up and your weight shifts onto the balls of your feet.
Why it happens: limited ankle dorsiflexion (common), tight calves, or trying to squat deeper than your current mobility allows.
Fix: Two paths. Short-term: elevate your heels slightly on weight plates (2.5–5 lb) or wear lifting shoes with an elevated heel. This takes mobility out of the equation so you can squat deeply with good form. Long-term: work on ankle mobility directly — 3 minutes of standing calf stretches, knee-to-wall ankle rocks, and deep squat holds daily. Most people add 10–15 degrees of dorsiflexion within 4–6 weeks of consistent work.
Mistake 3: Lower back rounding at the bottom (“butt wink”)
What it looks like: at the very bottom of the squat, your pelvis tucks under and your lower back rounds. You can usually see it in a side-view video.
Why it happens: going deeper than your current hip mobility allows, tight hamstrings, weak core bracing, or some combination.
Fix: Squat only as deep as you can maintain a neutral spine. This is probably slightly shallower than you were going — that’s fine. Use this range for all working sets. Meanwhile, work on hip mobility with 90-90 hip stretches, Cossack squats, and deep goblet squat holds (drop into a squat with a light goblet weight and hold for 30–60 seconds). As mobility improves, your clean depth naturally increases.
Mistake 4: Forward-leaning torso (“good morning” squat)
What it looks like: your chest falls forward on the way down, your hips shoot up on the way back up, and the squat turns into a weird hybrid of a squat and a deadlift.
Why it happens: quad weakness relative to the load, core instability, or bar position too low for your mobility (on barbell squats).
Fix: Reduce the weight by 20%. Add a 2-second pause at the bottom of every rep — this removes any bounce momentum and forces the quads to start the concentric phase clean. Also add front-rack squats or goblet squats to your program once per week; they’re self-correcting for this mistake because the load placement forces an upright torso.
Mobility work to support your squat
Five minutes of targeted mobility work, done most days, improves squat form faster than any form cue. Run this list before your squat sessions, or tack it onto your morning routine:
- Deep squat hold: 60 seconds, chest up, breathing steady. If you can’t hold the bottom position, use a doorframe or TRX strap for support.
- 90-90 hip stretch: 45 seconds per side. Opens hip internal and external rotation.
- Knee-to-wall ankle rock: 15 reps per side. Builds ankle dorsiflexion.
- World’s greatest stretch: 3 reps per side. Opens hips, thoracic spine, and shoulders in one movement.
- Couch stretch: 60 seconds per side. Stretches the hip flexors (tight from sitting).
When to use each squat variation
| Variation | Best for | Key cue |
|---|---|---|
| Bodyweight | Learning the pattern, warming up, daily movement | Full range of motion, clean rhythm |
| Goblet | Beginner to intermediate loaded work, mobility practice | Elbows inside knees at the bottom |
| Front squat | Quad focus, upright torso training | Elbows high, bar off the collarbone |
| Back squat (high-bar) | General strength, most non-powerlifting training | Bar on upper traps, upright torso |
| Back squat (low-bar) | Maximum loading, powerlifting | Bar on rear delts, forward lean controlled |
| Bulgarian split squat | Unilateral strength, balance, accessory work | Back foot elevated, front heel drives the lift |
| Wall sit | Quad endurance, isometric work | 90-degree knee angle, back flat against wall |
Where squats fit in a workout
For most people, one to two squat-focused sessions per week builds leg strength sufficient for daily life and sport. Pair squats with hip-hinge work (Romanian deadlifts, kettlebell swings) to train the posterior chain, and with single-leg work (split squats, step-ups) to balance side-to-side strength.
For a 30-day ramp focused specifically on squat volume and progression, the layers nicely once your bodyweight form is clean.
For a broader leg day framework that uses squats as the anchor movement, see .
Frequently asked questions
Should my knees never pass my toes?
This is the most famous and most wrong squat cue. Your knees can and should pass your toes — that’s normal in a deep squat, particularly for people with longer femurs. The real cue is that your knees should track over your toes (same direction), and your weight should stay through the middle of your foot. The “knees behind toes” rule came from a 1970s study on knee shear forces that was badly interpreted, and it’s been propagated ever since.
How deep should I squat?
As deep as you can while keeping heels flat, chest up, and neutral spine. That depth is your current ceiling. Work on mobility to increase it. For strength training purposes, hip crease at or below knee crease (parallel or below) is the benchmark for a “full” squat.
Is it okay if my squats look different from other people’s?
Yes — usually. Hip structure, femur length, and ankle mobility vary enormously across people. Your squat will look different from someone 6 inches taller or shorter. What matters is whether the core pattern holds: neutral spine, weight through the middle of the foot, knees tracking over toes, consistent depth. The aesthetic is less important than those fundamentals.
My knees hurt when I squat — should I stop?
Sharp, sudden pain: stop and see a doctor or physical therapist. Diffuse ache or stiffness that fades within 24 hours is usually form-related — film yourself, check the four mistakes above, and reduce volume or load while you address the issue. Never power through sharp knee pain; it almost always gets worse.
How often should I squat?
Two focused sessions per week is the sweet spot for most non-athletes. One is enough for maintenance. Three or more requires careful programming to avoid overtraining. Daily bodyweight squats (like the 30-day challenge) work because they’re low-intensity and recoverable.
Do I need a coach?
For bodyweight and goblet squats, no — the cues in this article plus video self-assessment are usually enough. Once you move to barbell squats over 1.5× bodyweight, a few sessions with a qualified coach is money well spent. You have one set of knees.
The bottom line
Squat by breaking hips and knees together, tracking knees over toes, keeping your chest up and weight on the middle of your foot, and going as deep as your mobility allows while keeping a neutral spine. That’s the whole movement.
Get the bodyweight version clean, then load it with a goblet squat, then progress to barbell only when technique is automatic. Fix the four common mistakes as they show up. Train twice a week. Over the course of a year your squat becomes the baseline of every other thing you do in the gym and most of the things you do in life.